[callout]I wrote this article a couple of years ago it has been very helpful for lots of people. When I wrote this article https://meetcircle.com/“>Circle and https://meetcircle.com/circle-go/“>Circle Go were not an option. What I currently use now is Circle. It cost $100.00 and for $4.99 you can have your settings stay on up to 10 phones anywhere they go including data streaming via their wireless data cell plan. Circle is well worth the money you will spend. You control their time on and off their devices as wells as time on specific apps if you choose. It filters content coming in as well as time on the device. It is a must if you have kids on devices of ANY kind. If you can’t afford Circle this article gives you some free options to help you. [/callout]
A few years ago, I talked about the need to limit time on devices for kids. While these devices are life-giving for kids and a game changer for kids with autism, most kids are on them too much. Limit time on these devices is difficult. So I thought some practical advice would help. Below is a free suggestion via The iTeach hub.
So how do you limit the length of a user’s session on an iPad?
One easy way that this can be achieved is with the Clock app. It is an Apple app that should be already on your iDevice. Follow these simple steps below to use the Clock app to set the duration of a user’s session:
- Launch the Clock app and select Timer.
- Set the timer for the amount of time that you would like your child to have access to the device for (in hours and minutes). Also, check that in Sounds (iPad) that Stop Playing is selected. If it is not select that option.
If you are using an iPhone or iPod the When Timer Ends display shows this information. Make sure it displays Stop Playing.
- Press Start and give the device to the user. After the timer runs out the device will bring up the Lock screen.
- If a Passcode Lock is set then the user will not be able to get access to the device without entering it.
The Clock app could also be used to transition students with special needs. When in the clock app this can be done by selecting Sounds at the top-left of the screen (When Timer Ends in iPhone/iPod). Select an option for a sound you want your child/students to hear as the timer finishes. This sound will be played every time the timer is activated but the device will not lock when a sound option is selected. If you use this feature as a sharing timer. You will need to activate the timer again for the next session. Simple.
What if I don’t have Passcode Lock set?
You can set a Passcode Lock by following the steps below:
- Click the Settings icon on the Home screen.
- From the left-hand sidebar select General. From the right-hand sidebar select Passcode Lock.
- When the Passcode Lock screen is displayed select Turn Passcode On.
The Set Passcode pad will then pop up. Enter a Passcode that you will never forget. In another popup then enter it again. - IMPORTANT – Make sure that the Erase Data slider is set to the OFF position. If you don’t do this and the wrong password is selected 10 times all of your data will be deleted.
- Then exit from settings.
Here are some apps that are in the app store that either cost money or have a subscription price to them.
 ParentKit is a breakthrough monitoring app for parents. Using this app gives parents the option to set up a schedule and parental control for their child’s device. The best part is that you do it from your own device, which acts as a remote. You can now schedule your child’s usage on safari, purchased apps and shows, all from your own device. This app allows you to choose what your child can use their device for and when.

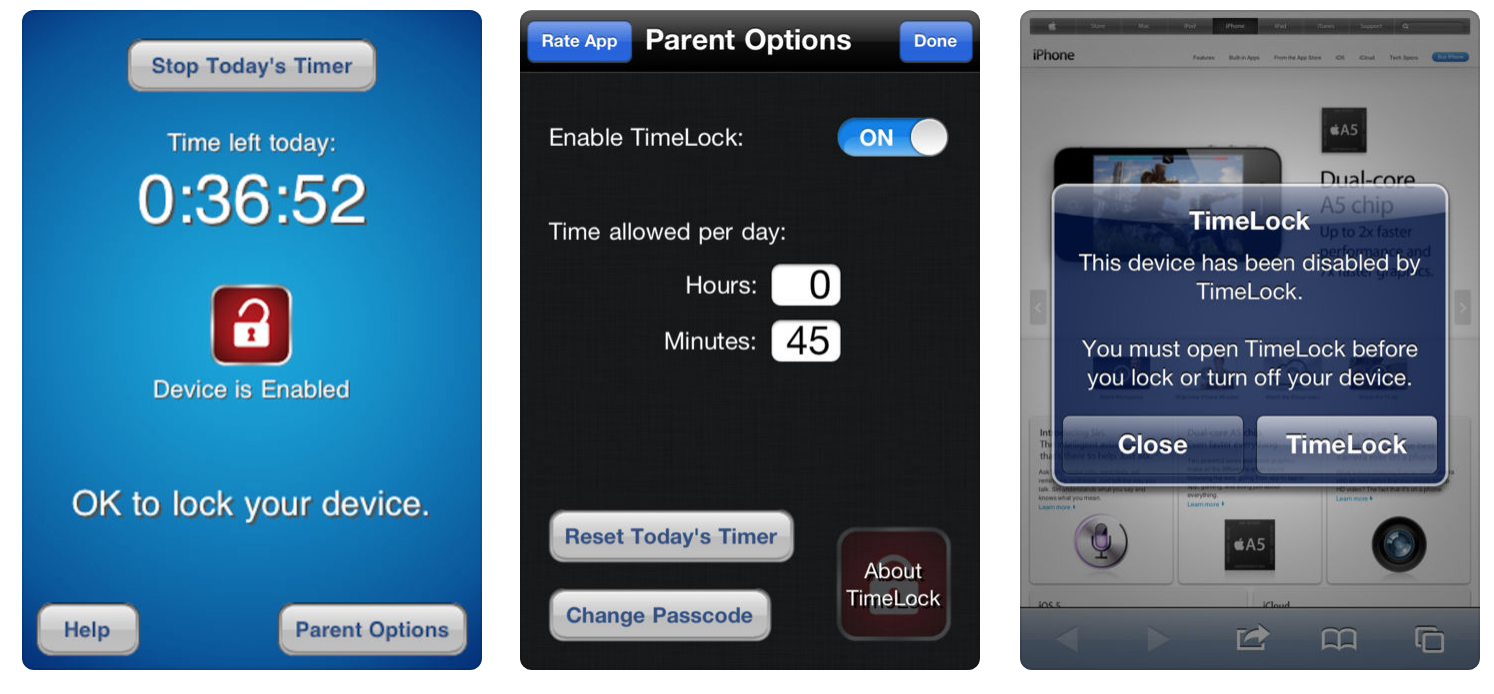
Parental Timelock – Finally a time limits application that actually WORKS!
Now you can EFFECTIVELY manage your child’s daily usage. No gimmicks, the app just works!
TimeLock allows parents to set a daily usage time limit on their child’s iPod, iPhone or iPad. It automatically disables the device when that time limit is over and resets the timer every day. Once installed and set up, TimeLock is completely autonomous, which means your child will only be able to use the device for a set time each day without your intervention.
FEATURES:
‣ Set a daily time limit on any iDevice to limit how much time the device can be used each day.
‣ Your child can start and stop the timer at any time during the day so the time limit does not have to be used all at once.
‣ When the timer runs out, popups appear constantly to effectively stop your child using their device.
‣ The timer is reset automatically each day.
To use a timer and limit your child’s use of the iPad to one app for homework use Apple’s Guided Access feature.
Here is how you do that via Cnet
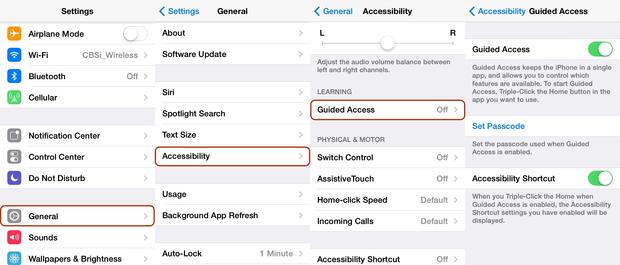
Apple’s Guided Access feature allows parents, teachers, and people with disabilities, to temporarily restrict the entire device to a single app. The home button is disabled, along with multitasking, allowing users to work within a single app without distraction.
You’ll find Guided Access by going to Settings, General, Accessibility, and then scroll down to Guided Access. To get started, flip the switch and tap Set Passcode to create a four-digit passcode, ideally, one that your kid won’t be able to guess.
Next, find the app you want to lock into Guided Access mode and launch it. Once it’s up and running, quickly tap the home button three times.
Now, because apps may contain settings menus or in-app purchase options that you don’t want meddled with, Guided Access gives you a chance to mark out any areas on the screen that you want to disable. To do that, simply circle those areas on the screen with your finger.
You also have an options button down across the bottom, giving you a separate menu for disabling the sleep/wake button, volume buttons, touch control, and motion control. By default, sleep and volume are disabled, but touch and motion are left on.
When you’re ready to lock in the app, press the Start button in the top right. If you disabled any areas of the screen, you’ll see those as slightly grayed out. You’ll also notice that if you hit the Home Button, a little banner rolls in from the top reminding you that you’re in Guided Access mode.
When it’s time to put it back to normal, all you have to do is triple-click the home button again, enter that four-digit password you created, and you’re free again to use the iPad however you wish.
If you want to set a new app for Guided Access, there’s no need to return to the Settings menu. Simply open up the new app and triple-click to turn Guided Access on again.
Pingback: Top Blog Posts of 2014 - samluce.com
Pingback: Reflection and Discussion Questions Chapter 1 | Technology for Teaching
Pingback: » The Day the IPad went on Vacation
Hi, I’ve been searching for some tips to limit my kids being online and I have to say I love they way you wrote this article – everything is clear and straight to the point. Too bad the images are broken, they would help a lot.
Thanks for the heads up I have fixed the links
I am using MobiLock to lock my iPad and only given access to apps those are useful for children.
Pingback: Timer Lockout for iOS allowing multiple apps - PhotoLens